
One of the beautiful things about marketing online is that you can track almost anything. Social media analytics allow you to analyze trends, see what is (or isn't working), and ultimately get the most out of your efforts.
My choice of tracking general website activity is Google Analytics.
I've touched on how using Google Analytics can help you make smart business decisions, and also mentioned how people should stop focusing on tracking vanity social media metrics. And you can even tie it into Google Data Studio to make a sweet SEO report.
But here's the deal:
Most people don't utilize Google Analytics for social media tracking the right way in order to really know what does or doesn't work in regards to their social media efforts.
And if you are a social media manager, you'll definitely want to check this out.
[yellowbox]Get More Accurate Social Media Metrics Today: Get access to a free downloadable PDF checklist that will show you how to get more accurate social media metrics with the Social Superhero Approach.[/yellowbox]
Want to know how to use Google Analytics for social media tracking?
In this post, I'll outline how I go about making sure you know exactly where social traffic is coming from and if it is a result of your efforts. Best of all, you'll walk away with actionable steps and a scalable process to implement yourself and prove the value of your social media activities.
In fact, it should take about 20 minutes to implement.

 How cool is that?
In the first quarter of this year, these social media efforts were responsible for 5,195 visitors and 57 newsletter subscribers.
But before they implemented this tracking method at a large scale, these social media efforts resulted in an unknown amount of visitors and newsletter subscribers.
Essentially....wait for it...
...They went from a zero to a hero. (Yeah, I just said that).
Sure, Google Analytics showed social traffic, but how do you know if it came from this person's efforts?
They didn't and here's why...
How cool is that?
In the first quarter of this year, these social media efforts were responsible for 5,195 visitors and 57 newsletter subscribers.
But before they implemented this tracking method at a large scale, these social media efforts resulted in an unknown amount of visitors and newsletter subscribers.
Essentially....wait for it...
...They went from a zero to a hero. (Yeah, I just said that).
Sure, Google Analytics showed social traffic, but how do you know if it came from this person's efforts?
They didn't and here's why...
 2. Click on the "Social" link (listed as #2 in the above image) and you will see a breakdown of the social channels that referred traffic to your website.
 3. Next, click on the Twitter link. You will see the next screen doesn't really provide any additional insight.
 How did Twitter refer these people?
Was it from a post you shared on social media?
Was it something tweeted by a reader?
In reality, this data can only tell us so much (which isn't really much at this point). So how can we attribute more information into our analytics?
Well, I've got 4 words for you...
Urchen tracking module parameters.
Doesn't sound familiar to you? Most commonly, this is simply referred to as UTM parameters.
How did Twitter refer these people?
Was it from a post you shared on social media?
Was it something tweeted by a reader?
In reality, this data can only tell us so much (which isn't really much at this point). So how can we attribute more information into our analytics?
Well, I've got 4 words for you...
Urchen tracking module parameters.
Doesn't sound familiar to you? Most commonly, this is simply referred to as UTM parameters.
 Sure this is probably ok to use if you are doing a single URL, or perhaps a handful.
But what if you want to create UTM URLs for several hundred or even thousands of URLs?
You surely are not going to want to use that, are you?
I didn't think so.
Sure this is probably ok to use if you are doing a single URL, or perhaps a handful.
But what if you want to create UTM URLs for several hundred or even thousands of URLs?
You surely are not going to want to use that, are you?
I didn't think so.
 Once the spreadsheet is setup, I can easily add URLs into the column and then have my UTM parameters applied.
This makes it drop-dead simple to bulk create massive amounts of URLs to share on various social media channels.
You can take it even a step further by creating your whole social media update in Excel.
This will blow your mind, so here we go...
Once the spreadsheet is setup, I can easily add URLs into the column and then have my UTM parameters applied.
This makes it drop-dead simple to bulk create massive amounts of URLs to share on various social media channels.
You can take it even a step further by creating your whole social media update in Excel.
This will blow your mind, so here we go...
 Save this file - you don't want to lose what you have done so far.
Do you already have Niels Bosma's SEO Tools for Microsoft Excel plugin? Great, skip down a bit.
If it's not installed, stay with me.
Go ahead and download it here.
Follow the setup instructions to get it installed.
All setup? Good. Let's keep going.
If you are not familiar with this Microsoft Excel plugin, I've done some pretty cool things using it. For example:
Save this file - you don't want to lose what you have done so far.
Do you already have Niels Bosma's SEO Tools for Microsoft Excel plugin? Great, skip down a bit.
If it's not installed, stay with me.
Go ahead and download it here.
Follow the setup instructions to get it installed.
All setup? Good. Let's keep going.
If you are not familiar with this Microsoft Excel plugin, I've done some pretty cool things using it. For example:
 What you want to do next is take the data from these two columns and bring them into your UTM parameter spreadsheet you previously created. You will want to paste the URL into your URL column (Column A) and then paste the blog post title into a new column (Column F).
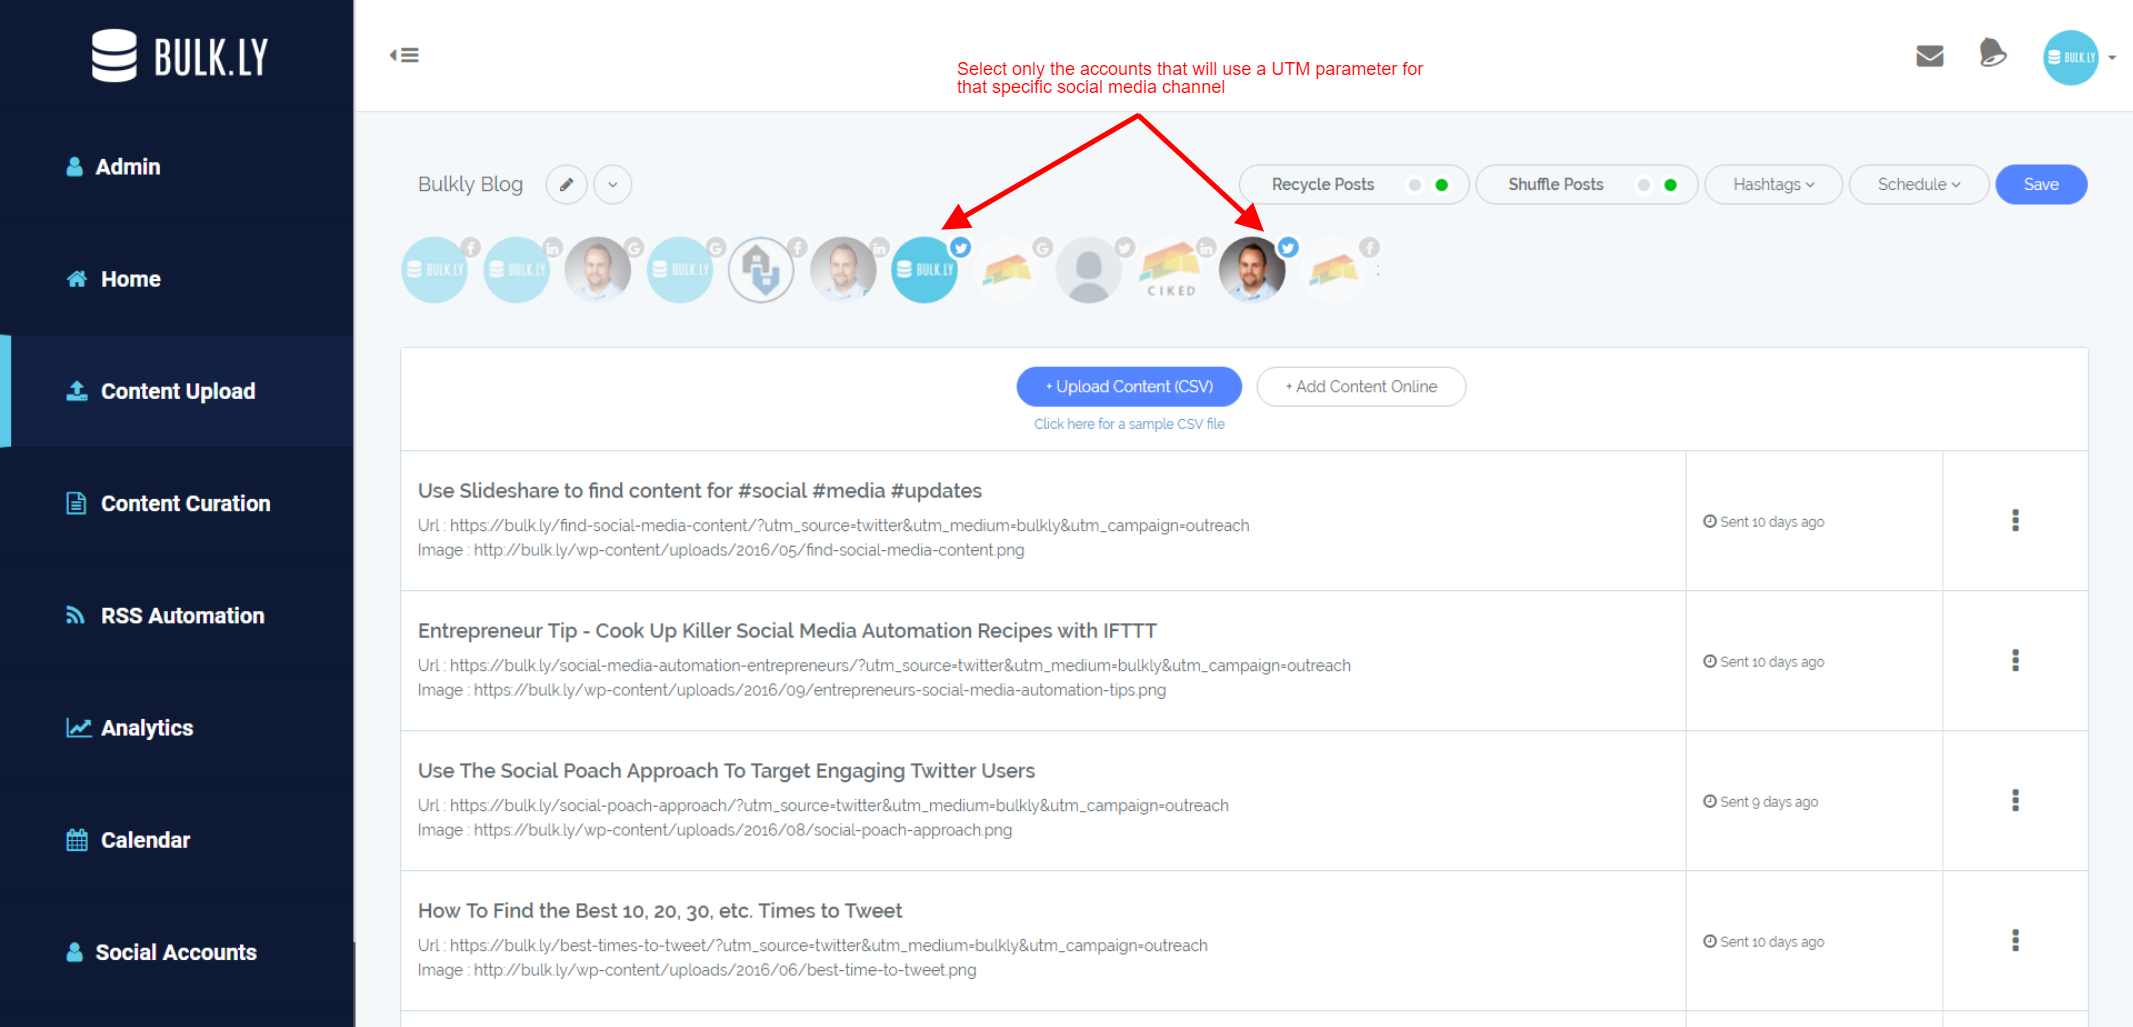
 Please note that you will need to create a separate CSV file to upload for each social media channel you want to post to. This is due to the fact that you will want to use your social media specific UTM parameter for each social account when using the Social Superhero Approach.
For example, your Twitter account will need to use the URL with "utm_source=twitter" while your LinkedIn account will need to use "utm_source=linkedin". If you don't want to create new CSV files, you can do a simple find and replace for your "utm_source" string and replace it with the next social media channel you want to schedule posts for.
Unfortunately, Hootsuite doesn't allow you to designate in your CSV which social media account you want to post the update to.
Oh well, small price to pay in order to get more accurate data!
Please note that you will need to create a separate CSV file to upload for each social media channel you want to post to. This is due to the fact that you will want to use your social media specific UTM parameter for each social account when using the Social Superhero Approach.
For example, your Twitter account will need to use the URL with "utm_source=twitter" while your LinkedIn account will need to use "utm_source=linkedin". If you don't want to create new CSV files, you can do a simple find and replace for your "utm_source" string and replace it with the next social media channel you want to schedule posts for.
Unfortunately, Hootsuite doesn't allow you to designate in your CSV which social media account you want to post the update to.
Oh well, small price to pay in order to get more accurate data!
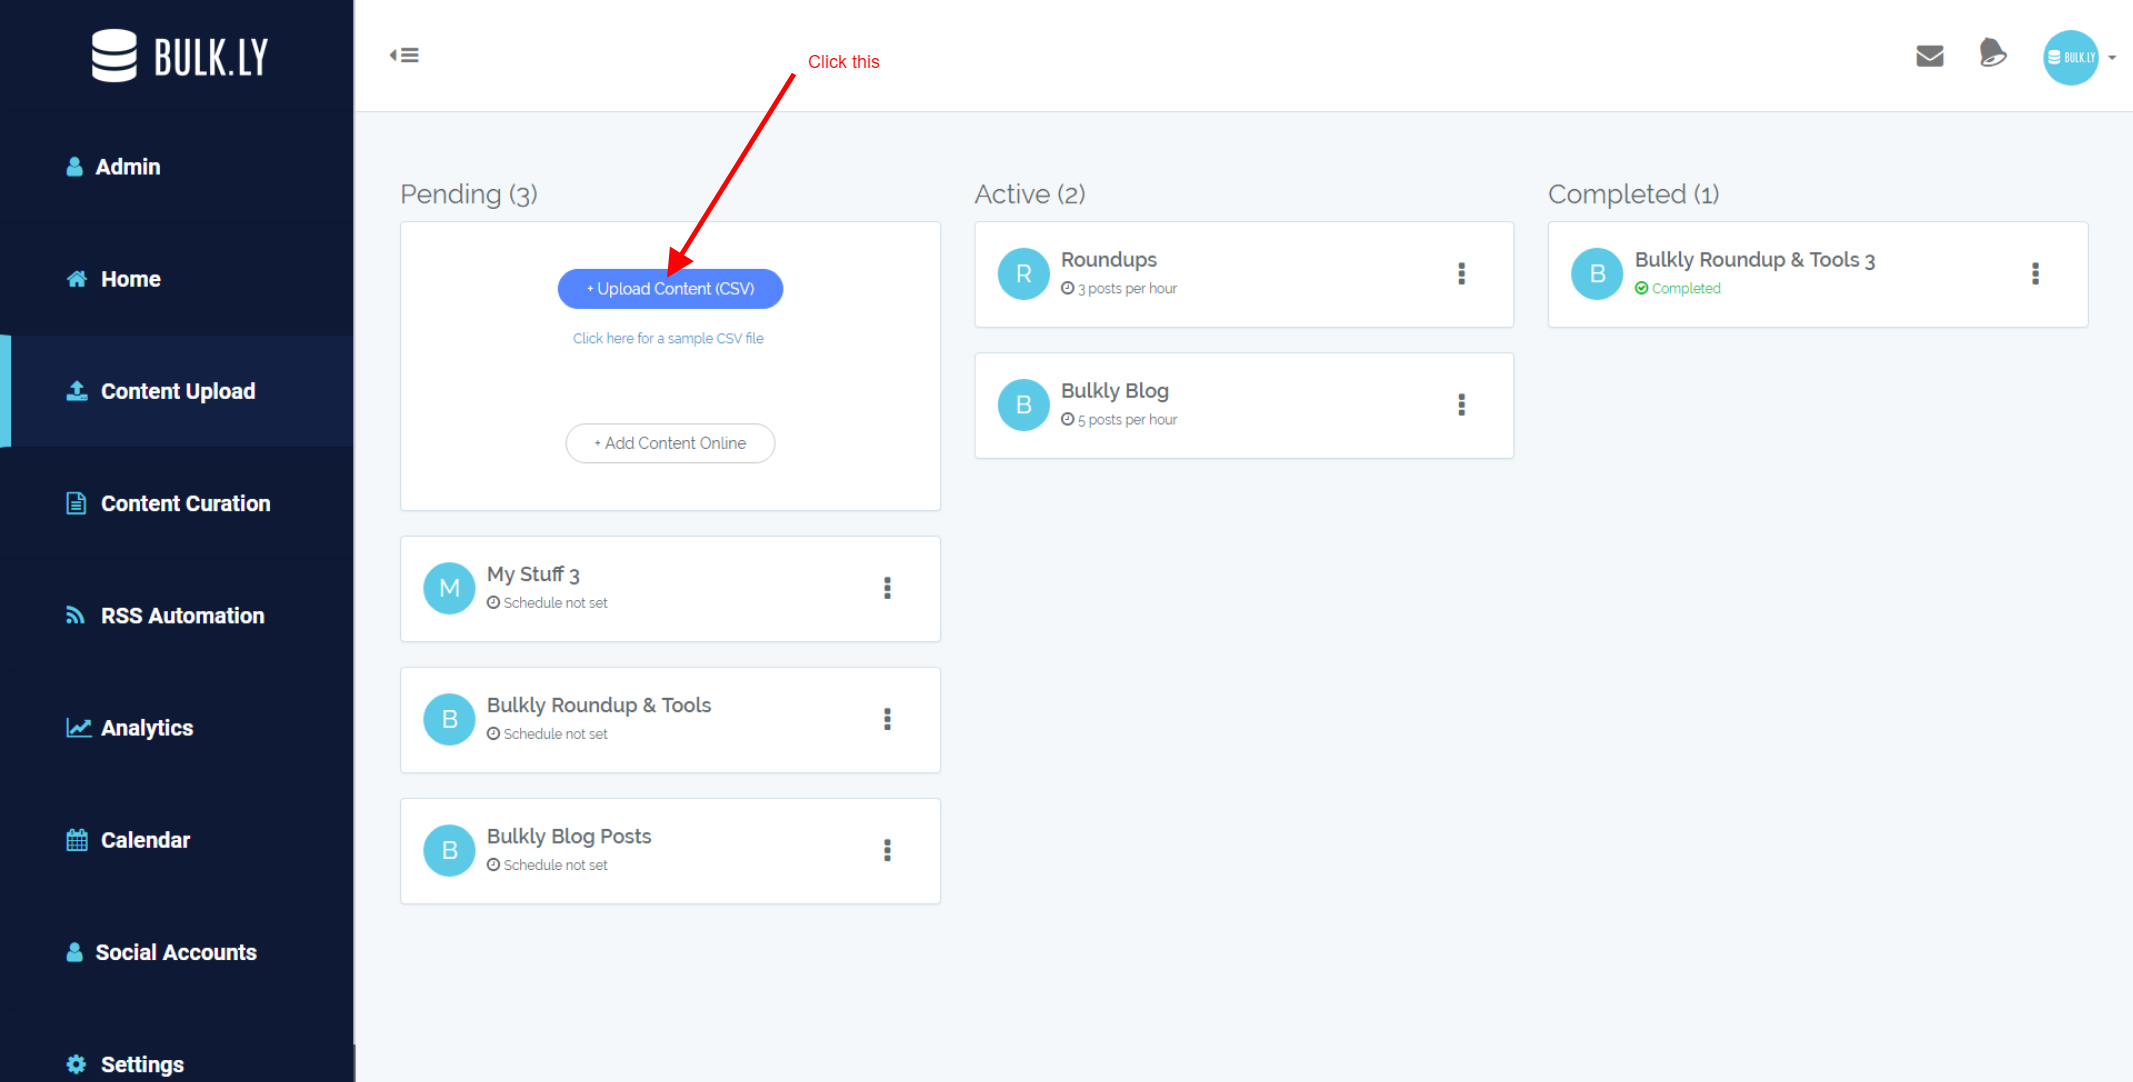 Upload the CSV file you created.
Bulkly will upload the data from your CSV and show it all on the following screen.
Next, you will need to select which social media account(s) you want to post to.
In order to get the most accurate info from the Social Superhero Approach, you should individually create CSV's for each channel with unique utm_medium parameters. Therefore, you should be selecting a single social media account that matches your UTM parameters.
Upload the CSV file you created.
Bulkly will upload the data from your CSV and show it all on the following screen.
Next, you will need to select which social media account(s) you want to post to.
In order to get the most accurate info from the Social Superhero Approach, you should individually create CSV's for each channel with unique utm_medium parameters. Therefore, you should be selecting a single social media account that matches your UTM parameters.
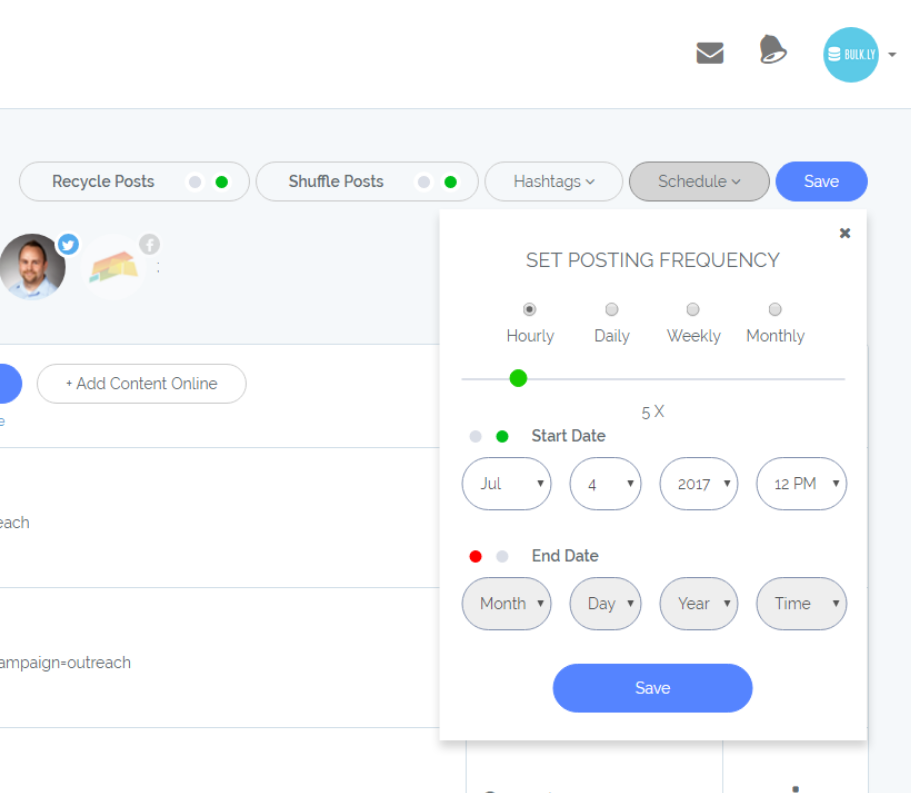
 One cool thing about Bulkly is that you don't have to figure out the different times to schedule your posts. Instead, the "Schedule" drop down allows you to pick how often Bulkly drips this content into your Buffer account. You can send multiple times hourly, daily, weekly or monthly.
For example, if you wanted to send posts 5 times an hour, it would look like this:
One cool thing about Bulkly is that you don't have to figure out the different times to schedule your posts. Instead, the "Schedule" drop down allows you to pick how often Bulkly drips this content into your Buffer account. You can send multiple times hourly, daily, weekly or monthly.
For example, if you wanted to send posts 5 times an hour, it would look like this:
 Once you have your setting configured, simply click the "activate" button and Bulkly will send everything to your Buffer queue.
 If you use Hootsuite, you should not have any issues with them overwriting your UTM parameters. I have been using them for awhile without any trouble.
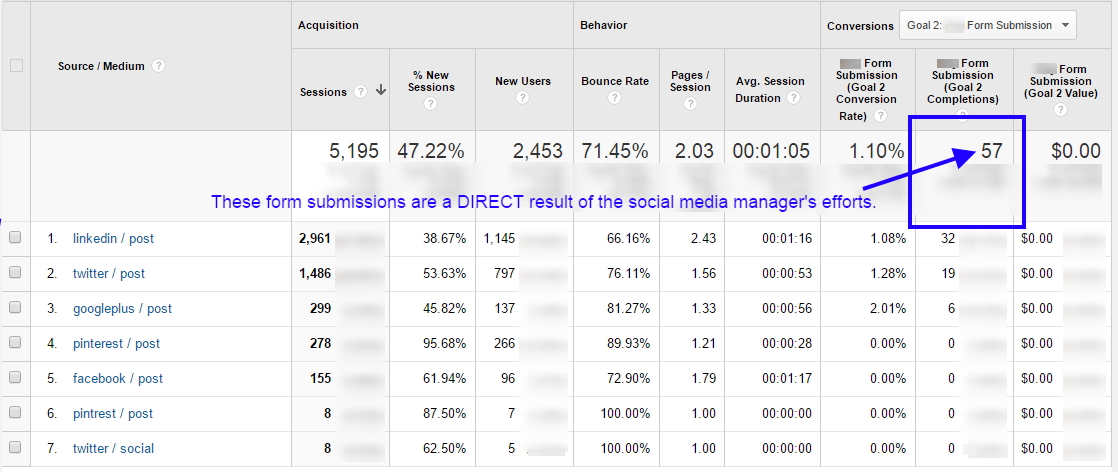 Without using the Social Superhero Approach, these social referrals would have all been lumped/lost in Google Analytics with no attribution to the Social Media Manager's work.
The Social Superhero Approach provides validation of a job well done.
Without using the Social Superhero Approach, these social referrals would have all been lumped/lost in Google Analytics with no attribution to the Social Media Manager's work.
The Social Superhero Approach provides validation of a job well done.
How I Used the Social Superhero Approach to Prove a Social Media Manager's Value
Whether you are a social media manager, a do-it-yourself social media marketer, or perhaps a small business who wants to know the real results social media marketing efforts drive to your website, the Social Superhero Approach will give you no doubt if your efforts are working (or not). And best of all, even as this client had over 300 blog posts, the Social Superhero Approach is completely scalable for any size website - especially if you are running an influencer campaign. I was able to implement this for my client in less than 20 minutes without the need for some high priced social media analytics tools. Using this approach, my client could not only attribute the social media efforts for website traffic, but they could also see how many new blog subscribers were a result of this single person's social media efforts through their Google Analytics social media reports.
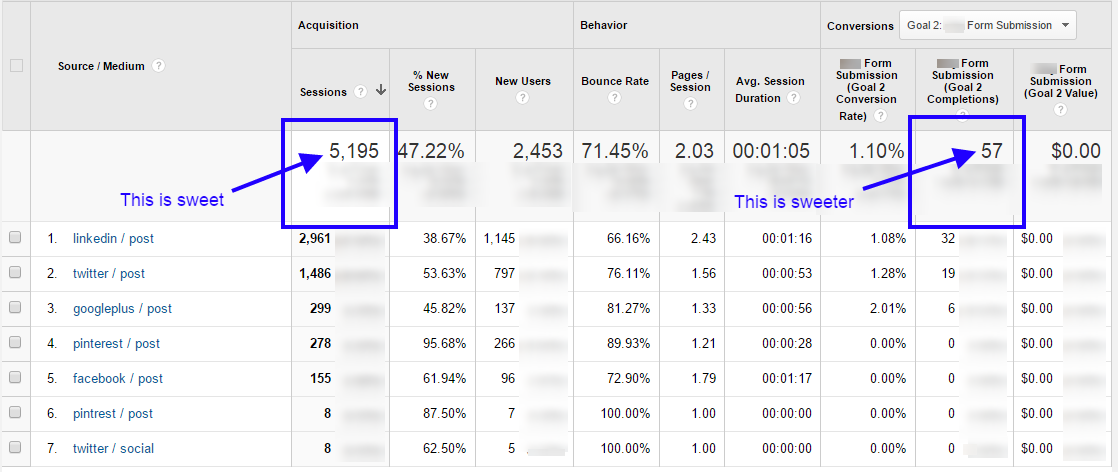
How cool is that?
In the first quarter of this year, these social media efforts were responsible for 5,195 visitors and 57 newsletter subscribers.
But before they implemented this tracking method at a large scale, these social media efforts resulted in an unknown amount of visitors and newsletter subscribers.
Essentially....wait for it...
...They went from a zero to a hero. (Yeah, I just said that).
Sure, Google Analytics showed social traffic, but how do you know if it came from this person's efforts?
They didn't and here's why...
Don't Rely on Out-of-The-Box Social Media Analytics Tracking
Look, most people simply queue up their social media updates haphazardly. In fact, until recently I have been lazy on tracking my own personal social media efforts (but never my clients). If you are like most, you may simply create an update on your favorite social media channel by copy/pasting the URL you want to share. You then can look in Google Analytics and see what the source for the traffic to that post was. But what does that really tell you? Did the visits come from your social media update from your profile? Or did it come from some random user sharing your URL? What if you schedule your social media updates with Buffer or Hootsuite? Then what if someone else does the same? How can you tell the difference? You can't. Your efforts and the efforts of others all look the same in Google Analytics by default. At best you can patchwork something together in Google Analytics to sort of get an idea, but it is not accurate by any means. So how do you fix it? Keep with me, we're getting to the good stuff where the Social Superhero Approach saves the day.Understand How Google Analytics Labels Your Website Traffic
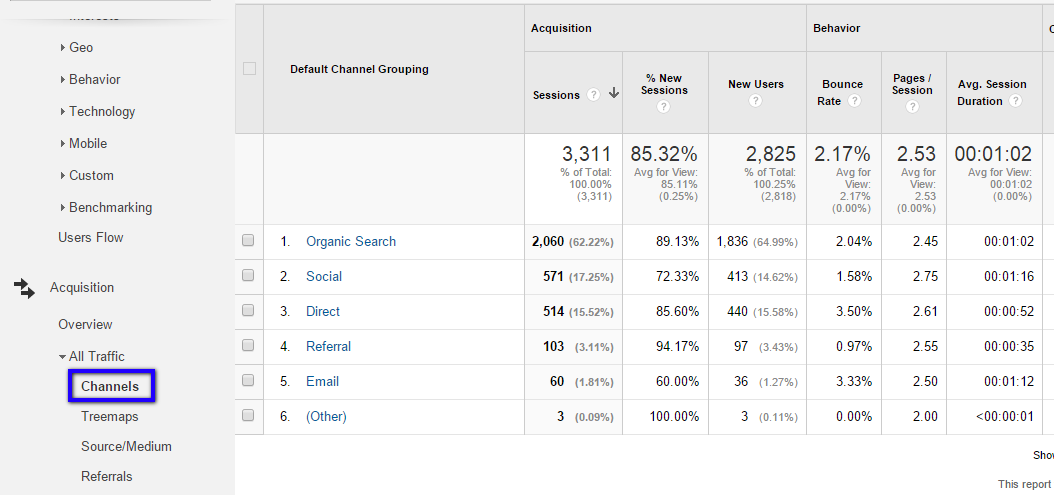
Google Analytics can easily show you where your visitors come from. To get a quick overview of how people find your site, login to Google Analytics and follow these steps. 1. In the left column select "Acquisition > All Traffic > Channels." You will see the default channel grouping of how analytics has determined the method a user made it to your site.
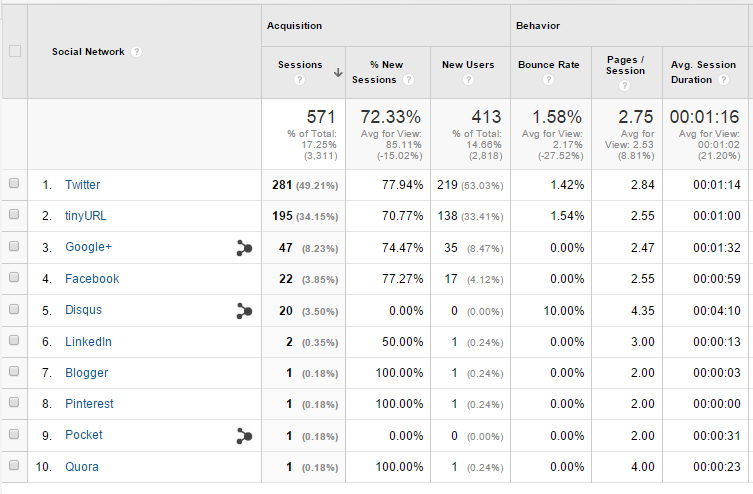
2. Click on the "Social" link (listed as #2 in the above image) and you will see a breakdown of the social channels that referred traffic to your website.
3. Next, click on the Twitter link. You will see the next screen doesn't really provide any additional insight.
How did Twitter refer these people?
Was it from a post you shared on social media?
Was it something tweeted by a reader?
In reality, this data can only tell us so much (which isn't really much at this point). So how can we attribute more information into our analytics?
Well, I've got 4 words for you...
Urchen tracking module parameters.
Doesn't sound familiar to you? Most commonly, this is simply referred to as UTM parameters.
What are Google Analytics UTM Parameters?
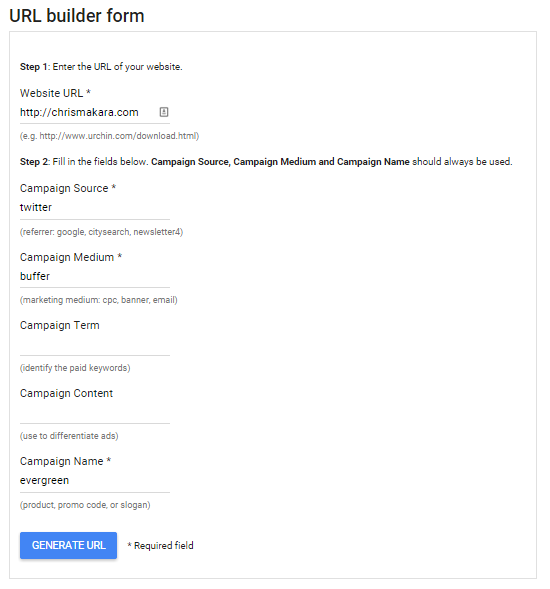
UTM parameters are simply a way to add some extra information to any URL and will override any other data that would typically pass into Google Analytics. For example, a standard URL you would share on social media might be:https://chrismakara.com/social-media/how-to-create-a-twitter-dashboard-in-excel/And when it is clicked, the data that shows up in Google Analytics will look a lot like the data shown in the above screenshots. But when you attach UTM parameters to the URL, you can get some key data into Google Analytics. So your URL that you would share would look like this:
https://chrismakara.com/social-media/how-to-create-a-twitter-dashboard-in-excel/?utm_source=twitter&utm_medium=hootsuite&utm_campaign=evergreenYou will notice that I have 3 different UTM parameters attached to this URL. These are the 3 required by Google Analytics, with the option of 2 more as explained below. Let's take a look at each to see what they mean and how we can use them.
utm_source (Required)
The utm_source parameter tells you what website this URL appeared on. In this case, it is Twitter. Please note that UTM parameters are case sensitive, so if you use "Twitter" on one URL and "twitter" on another, you will see two separate results in Google Analytics when looking at your campaigns.utm_medium (Required)
Using the utm_medium parameter will allow you to designate the medium your link was posted on. In this example, I have used Hootsuite since it is one tool I schedule tweets with. If I were scheduling this tweet with Buffer, I would use "utm_medium=buffer". Then when I am digging into Google Analytics, I would be able to see all of my Twitter traffic, which came from Hootsuite or Buffer scheduled posts.utm_campaign (Required)
If you want to designate a particular campaign or initiative to the link you are sharing, then you add that data to the utm_campaign parameter. In my example link above, you will see that I used "evergreen". I chose this due to the fact that I have certain blog posts that are evergreen in nature. This means that they really don't expire for the most part and are a great opportunity to reshare again. Of course you can name this parameter whatever you would like. For example, it could be the name of your initiative.utm_term (Paid Search Only)
While this post is really focused on social media tracking, the utm_term parameter is an optional parameter for Google Analytics. However, this parameter is used to pull in the keyword search data for an Adwords ad. Since it is optional and applies to paid search, there is no need for us to use it in our URL.utm_content (Optional)
The final UTM parameter is utm_content. This parameter is optional. Should you decide to use it, typically it is used to track A/B testing or links that point to the same URL.A Scalable Way to Accurately Track Your Social Media Efforts
Now that you know what UTM parameters are, let's see why they are needed to more accurately track your social media efforts. As shown above, if you are not using UTM parameters you are not in total control of the data being passed back to Google Analytics from your social media updates. But check this out: When you apply UTM parameters to your different social media channels, you can start to paint a clearer picture on how your social media efforts impact traffic to your website and ultimately prove your worth if you are a social media manager. So what's the best way to do that? And how can you do it at scale? I am talking hundreds or thousands of URLs. I'm going to show you how I used the Social Superhero Approach that I used with one of my clients. Here's the kicker: Until now, you have probably relied on the Google UTM builder to create your URLs.
Sure this is probably ok to use if you are doing a single URL, or perhaps a handful.
But what if you want to create UTM URLs for several hundred or even thousands of URLs?
You surely are not going to want to use that, are you?
I didn't think so.
Step 1: Setting Up Your Social Media UTM Parameters
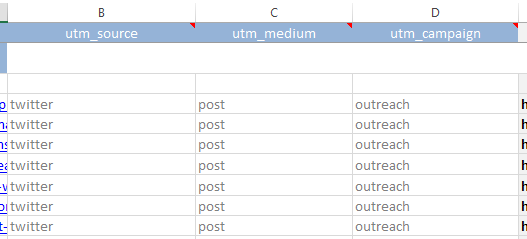
Using the Social Superhero Approach you are not going to rely on the Google UTM URL Builder. Nope, you are going to use Microsoft Excel to create a social media metrics dashboard for creating UTM parameters. Don't be scared of Excel, I'll walk you through it. So open up Excel and let's jump in. As I mentioned before, UTM parameters are case sensitive. Therefore, you need to create a naming convention and stick with it. I typically like to do everything in lowercase. This way I don't have to remember to capitalize a letter. The first thing I do is setup an Excel spreadsheet that will allow me to easily create and track my URLs and UTM parameters. I have a columns for the following items:- URL (Column A) - The URL you want to share
- UTM Source (Column B) - Where the user was when they clicked the link. This is usually the media channel (Twitter, LinkedIn, Facebook, etc)
- UTM Medium (Column C) - This is where the link was presented to the user. What channel was used to share/send out the link. In most instances this will be your choice of a social media scheduling software (Buffer, Hootsuite, etc)
- UTM Campaign (Column D) - This is the name of the campaign (Outreach, Evergreen, Fall Sale, etc)
- UTM Ready Link (Column E) - This is the column where I use some Microsoft Excel hocus-pocus to automatically build the UTM ready URL based on the data I have entered. It's simply Excel's concatenate formula. So it may look something like this:
=IF(A4="","",CONCATENATE(A4,IF(B4="","","?utm_source="),IF(B4="","",B4),IF(C4="","","&utm_medium="),C4,IF(D4="","","&utm_campaign="),IF(D4="","",D4)))Don't worry if that formula doesn't make much sense, I'll give you a link to download a ready made Excel file at the end of this post.
 Once the spreadsheet is setup, I can easily add URLs into the column and then have my UTM parameters applied.
This makes it drop-dead simple to bulk create massive amounts of URLs to share on various social media channels.
You can take it even a step further by creating your whole social media update in Excel.
This will blow your mind, so here we go...
Once the spreadsheet is setup, I can easily add URLs into the column and then have my UTM parameters applied.
This makes it drop-dead simple to bulk create massive amounts of URLs to share on various social media channels.
You can take it even a step further by creating your whole social media update in Excel.
This will blow your mind, so here we go...
Step 2: Find All Your Posts to Share on Social Media
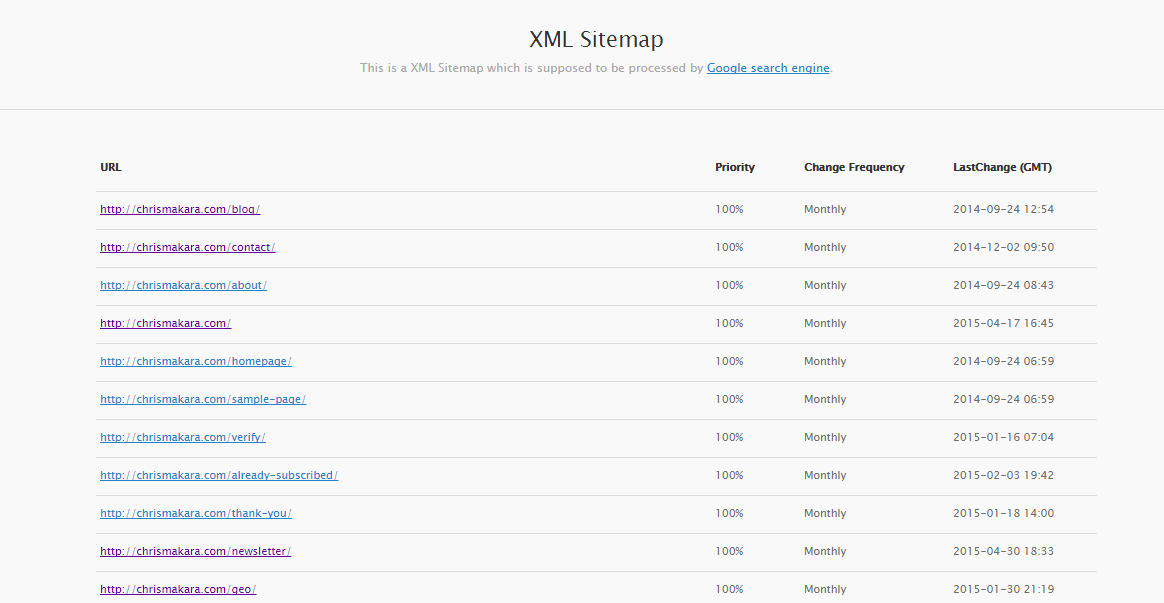
If you have made it to the point of creating the Excel file similar to the previous section, we can use some mind blowing tricks to easily create UTM trackable social media updates for all of your favorite social media channels at a massive scale. The first thing you need to do is get a list of all the URLs you want to share on social media. If you have an XML sitemap, this can be done in a few simple steps (you have a sitemap? right?).- Visit your XML sitemap link, like https://chrismakara.com/sitemap.xml
- Highlight all the data. Right click and copy (Ctrl+C)
- Go to Microsoft Excel and paste in the data in a new file in Column A
Save this file - you don't want to lose what you have done so far.
Do you already have Niels Bosma's SEO Tools for Microsoft Excel plugin? Great, skip down a bit.
If it's not installed, stay with me.
Go ahead and download it here.
Follow the setup instructions to get it installed.
All setup? Good. Let's keep going.
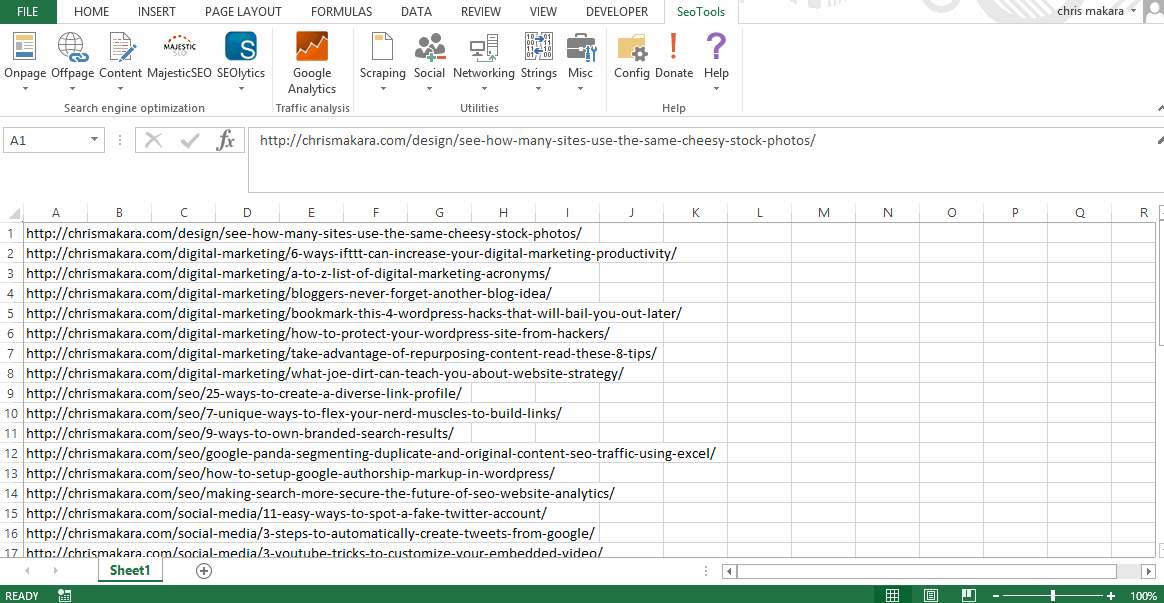
If you are not familiar with this Microsoft Excel plugin, I've done some pretty cool things using it. For example:
- Create an Excel file that scrapes Twitter data? Check.
- Build an Instagram dashboard of user data? Check.
=HtmlH1(A1)Then you will need to drag this formula down for all the URLs. Give it a minute (or two) and you will see all the blog titles magically appear. Of course this works only if you use H1 tags for the title of your blog post. Which you do, right? If you happen to use H2 or even H3 tags, simply change the formula above to reflect that.
What you want to do next is take the data from these two columns and bring them into your UTM parameter spreadsheet you previously created. You will want to paste the URL into your URL column (Column A) and then paste the blog post title into a new column (Column F).
Bonus Tip - Want to Use Your Meta Description Instead?
Perhaps you would like to use something other than your blog post title for the text of the social media update? I bet you have a rockin' meta description that is sure to attract some attention. So instead of using the formula "=HtmlH1(A1)", you can use this:=HtmlMetaDescription(A1)Be sure to drag this formula all the way to the end of your URL list. Within a minute or two, you'll have your meta descriptions loaded into Excel. One thing to keep in mind is that you'll probably want to use the meta description on all social channels except for Twitter. You know, they have that whole 140 character limit thing...
Step 3: Creating Your UTM Trackable Social Media Updates
Now that you have all your data in one spreadsheet, let's use some Microsoft Excel magic to put together some social media updates with your UTM parameters. For example, let's use Column G. In Column G, you will want to use Excel's concatenate formula. With this formula we will be combining the blog post title and the URL with the UTM parameter link. Your formula should look something like this:=CONCATENATE(F4, " - ",E4)Where column F is your blog post title and Column E is your already concatenated URL with UTM parameters. Of course, you could also just go ahead and concatenate the UTM parameters in this cell instead. You'll need to copy down this formula for all your rows of data. Just give it a second and you'll have complete social media updates with your blog post title and UTM tracking parameters.
Step 4: Queue up Your Fully Trackable Social Media Updates
Now that your updates are ready to go with the Social Superhero Approach, you'll need to upload them to your favorite social media management platform. I'll cover two of my favorite platforms in this post, Hootsuite and Buffer.Schedule Your Bulk Social Media CSV Updates in Hootsuite
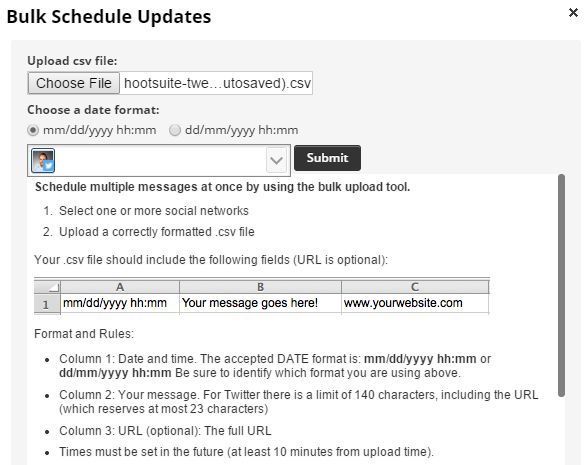
The first social media management platform I'll discuss is Hootsuite. In order to upload these social media updates, we'll use the ability to bulk upload updates through a CSV file. But before we jump into Hootsuite, we need to create a CSV file in the proper format. For Hootsuite, your CSV needs to have the date you want to post the update in Column A, the content of the update in Column B, and the URL in Column C (optional). So what you can do is simply copy Column H from the file we created above (where you concatenated the blog post title and the UTM parameter URL) and paste this into Column B of your Hoostsuite Excel file. Then in Column A, you will need to enter the day/time that you want the update to post at. Just a reminder, the correct format is mm/dd/yyyy hh:mm or dd/mm/yyyy hh:mm. You'll be able to leave Column C empty since your URL is in Column B already. Save the file as a CSV. Once logged into your Hootsuite account, in the left hand menu click on "Publisher > Bulk Message Upload". Then select the Hootsuite CSV you created and pick the social network channel your UTM source parameter is designating. For example, Twitter. Then submit the data.
Please note that you will need to create a separate CSV file to upload for each social media channel you want to post to. This is due to the fact that you will want to use your social media specific UTM parameter for each social account when using the Social Superhero Approach.
For example, your Twitter account will need to use the URL with "utm_source=twitter" while your LinkedIn account will need to use "utm_source=linkedin". If you don't want to create new CSV files, you can do a simple find and replace for your "utm_source" string and replace it with the next social media channel you want to schedule posts for.
Unfortunately, Hootsuite doesn't allow you to designate in your CSV which social media account you want to post the update to.
Oh well, small price to pay in order to get more accurate data!
Schedule Your Bulk Social Media CSV Updates in Buffer
If you've made it this far, I'm sure you are thinking "How are you going to get his data into Buffer? Are you crazy, you can't upload a CSV file to Buffer!" And you are right... ...but there is a way to do it! If you are a user of both Hootsuite and Buffer, you're well aware that an advantage Hootsuite has over Buffer is the ability to upload a CSV file with social media updates. However, I'm launching a website that allows you to upload a CSV file to Buffer (and some other cool things). So here's what you'll need to do.- Create a CSV file just like you would for Hootsuite in the section above.
- Create an account on Bulkly.
- Follow the steps to upload a CSV file to Buffer.
Upload the CSV file you created.
Bulkly will upload the data from your CSV and show it all on the following screen.
Next, you will need to select which social media account(s) you want to post to.
In order to get the most accurate info from the Social Superhero Approach, you should individually create CSV's for each channel with unique utm_medium parameters. Therefore, you should be selecting a single social media account that matches your UTM parameters.
One cool thing about Bulkly is that you don't have to figure out the different times to schedule your posts. Instead, the "Schedule" drop down allows you to pick how often Bulkly drips this content into your Buffer account. You can send multiple times hourly, daily, weekly or monthly.
For example, if you wanted to send posts 5 times an hour, it would look like this:
Once you have your setting configured, simply click the "activate" button and Bulkly will send everything to your Buffer queue.
Bonus Tip - Automatically Repost Social Media Updates
One cool thing about Bulkly is that you can also create social media updates that can be reposted to your social media accounts automatically. This is perfect if you have evergreen content. Simply follow the steps above and within your group, choose "Recycle Posts" and "Shuffle Posts". This will continuously send content to your Buffer account again and again in a random order. Practically a set and forget! While Bulkly is not open for everyone at the moment, be sure to sign up for an invite when it is.Read This If You Use Buffer to Schedule Social Media Updates
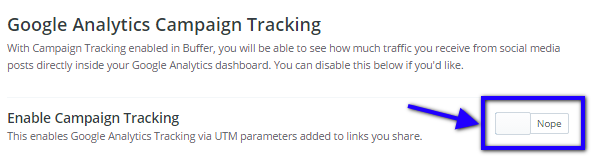
There is one thing I need to bring to your attention if you use Buffer to schedule your social media updates... For each of your social accounts you are scheduling posts with in Buffer, you need to be sure to disable the "Enable Campaign Tracking." If this is enabled, Buffer will use their own UTM parameters on your links. For each of your social media accounts in Buffer, you will need to click on the "Settings > Link Shortening" tab. Then scroll down and click "Nope" to disable Buffer's UTM tracking parameters.
If you use Hootsuite, you should not have any issues with them overwriting your UTM parameters. I have been using them for awhile without any trouble.
Step 5: Check Out Your Sweet, Sweet Data
Once your campaigns have been running for awhile, or if you have a high trafficked website your new properly attributed social media data will start to take shape in Google Analytics. To find this data, in Google Analytics click on "Acquisition > Campaigns > All Campaigns." Then click on your campaign name. This will bring up results similar to the above.
Without using the Social Superhero Approach, these social referrals would have all been lumped/lost in Google Analytics with no attribution to the Social Media Manager's work.
The Social Superhero Approach provides validation of a job well done.
Theodore M. DeBettencourt May 20, 2015
Great post (:
Chris Makara May 20, 2015
Thanks Theodore, hope you are able to put it to good use!
Steve Smith June 16, 2015
Hi Chris,
What an informative post you have shared here.
Really its so informative to analyze a website or a blog to incoming social media traffic. And the way that you have shared with so nicely , helps to understand easily.
Thanks for sharing…Please keep posting…
Best Calgary car repair center
Vũ Thanh Hải July 30, 2015
thank for post, great
Raul Tiru November 1, 2015
This is amazing Chris. I appreciate how much effort you put in your posts, so much. You really take your readers seriously.
I have just one dilemma at this point:
Going so deep into the analytics will cost me even more time than it already does. I often look at the clock and think; shoot, I’ve already spent three or four hours on social media and then I’m wondering if I couldn’t have use my time a bit better (Yes I’m using Social Media tools ;)).
This has little to do with your approach, which is great. For me, it’s enough to see that what I’m doing on social media is bringing me visitors that are engaging (stay for a few minutes, sign up etc).
I’ll be back for more. For now, have a great Sunday 😀
Chris Makara November 2, 2015
Hi Raul – Thanks for the kind words 🙂
Social media can definitely take up a ton of time and it’s great to hear you use tools to help out (I do the same). In the end, it’s all about finding balance and efficiency to get things done. By tying analytics to your efforts you can easily see if it was time well spent 😉
Sarah Hewitson January 18, 2016
Awesome post Chris, had no idea about the Buffer tracking setting. I’ve turned that setting straight off and off to setup the spreadsheet 🙂 Thanks!
Chris Makara January 18, 2016
Yeah, it’s kind of hidden 🙂
Let me know how it goes with the spreadsheet and posts moving forward!
paul senna January 2, 2017
Hey I know this is off topic but I was wondering if you knew of any widgets I couldadd to my blog that automatically tweet my newest twitter updates.
Chris Makara January 3, 2017
You could add your blog RSS feed to a tool like Bulkly (https://bulk.ly) and set it up to automatically recycle your blog posts as tweets. There are some WP plugins that will push your new posts to Twitter, but they only do it one time.